OAuth2 Introduction
OAuth-2
the
version 2 of the OAuth protocol (or framework).
OAuth2
defines 4 roles :
-
Resource Owner: Generally yourself/user.
-
Resource Server: Server hosting protected data (for example Google hosting your profile and personal information).
-
Client: Application requesting access to a resource server (it can be your PHP website, a Javascript application or a mobile application).
-
Authorization Server: Server issuing access token to the client. This token will be used for the client to request the resource server. This server can be the same as the authorization server (same physical server and same application), and it is often the case.
Application Registration
Since
you want to retrieve data from a resource server using OAuth2, you
have to register as a client of the authorization server.
Each
provider is free to allow this by the method of his choice. The
protocol only defines the parameters that must be specified by the
client and those to be returned by the authorization server.
Before
initiating the protocol, the client registers with the authorization
server. The means through which the client registers with the
authorization server are beyond the scope of this
specification
but typically involve end-user interaction with an HTML registration
form.
Client
registration does not require a direct interaction between the client
and the authorization server. When supported by the
authorization server, registration can rely on other means for
establishing trust and obtaining the required client properties(e.g.,
redirection URI, client type). For example, registration can be
accomplished using a self-issued or third-party-issued assertion, or
by the authorization server performing client discovery using a
trusted channel.
Before
using OAuth with your application, you must register your application
with the service. This is done through a registration form in the
“developer” or “API” portion of the service’s website,
Here
are the parameters (they may differ depending on the providers):
Client registration
-
Application Name: The application name
-
Redirect URLs: URLs of the client for receiving authorization code and access token
-
Grant Type(s): authorization types that will be used by the client.
-
Javascript Origin (optional): the hostname that will be allowed to request the resource server via XMLHttpRequest
Authorization server response
-
Client Id: unique random string
-
Client Secret: secret key that must be kept confidential
Authorization
Grant
OAuth
2 defines four grant types, each of which is useful in different
cases:
-
Authorization Code: used with server-side Applications
-
Implicit: used with Mobile Apps or Web Applications (applications that run on the user’s device)
-
Resource Owner Password Credentials: used with trusted Applications, such as those owned by the service itself
-
Client Credentials: used with Applications API access
The
two token types involved in OAuth 2 authentication are Access
Token
and
Refresh
Token.
1)
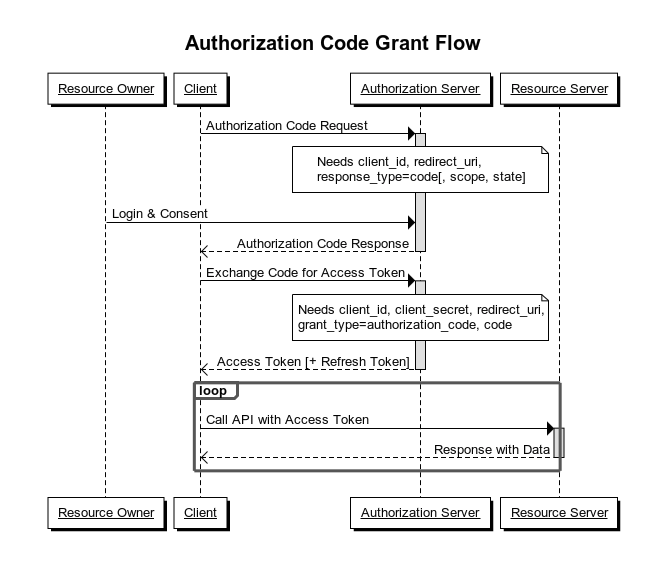
Authorization Code
The
authorization
code
grant
type is the most commonly used because it is optimized for
server-side applications, where source code is not publicly exposed,
and Client Secret confidentiality can be maintained. This is a
redirection-based flow, which means that the application must be
capable of interacting with the user-agent (i.e. the user’s web
browser) and receiving API authorization codes that are routed
through the user-agent.
The
authorization code grant type is used to obtain both access tokens
and refresh tokens and is optimized for confidential clients. The
client
secret
confidentiality
is not guaranteed.
It
should be used as soon as the client is a web server. It allows you
to obtain a long-lived access token since it can be renewed with a
refresh token (if the authorisation server enables it).
Example: (Red bus. Stack overflow login with Gmail)
-
Resource Owner: you
-
Resource Server: a Google server
-
Client: any website
-
Authorization Server: a Google server
Scenario:
-
A website wants to obtain information about your Google profile.
-
You are redirected by the client (the website) to the authorization server (Google).
-
If you authorize access, the authorization server sends an authorization code to the client (the website) in the callback response.
-
Then, this code is exchanged against an access token between the client and the authorization server.
-
The website is now able to use this access token to query the resource server (Google again) and retrieve your profile data.
2)
Implicit
The
implicit
grant
type is used for mobile apps and web applications (i.e. applications
that run in a web browser), where the client secret confidentiality
is not guaranteed. The implicit grant type is also a
redirection-based flow but the access token is given to the
user-agent to forward to the application, so it may be exposed to the
user and other applications on the user’s device. The
implicit grant type does not support refresh tokens.
 When
it should be used?
When
it should be used?
It
is typically used when the client is running in a browser using a
scripting language such as Javascript. This grant type does not allow
the issuance of a refresh token.
Example:
-
Resource Owner: you
-
Resource Server: a Facebook server
-
Client: a website using AngularJS for example
-
Authorization Server: a Facebook server
Scenario:
-
The Client (AngularJS) wants to obtain information about your Facebook profile.
-
You are redirected by the browser to the authorization server (Facebook).
-
If you authorize access, the authorization server redirects you to the website with the access token in the URI fragment (not sent to the web server). Example of callback: http://example.com/oauthcallback#access_token=MzJmNDc3M2VjMmQzN.
-
This access token can now be retrieved and used by the client (AngularJS) to query the resource server (Facebook). Example of query: https://graph.facebook.com/me?access_token=MzJmNDc3M2VjMmQzN.
The
implicit grant type is used to obtain access tokens (it does not
support the issuance of refresh tokens) and is optimized for public
clients known to operate a particular redirection URI. These
clients are typically implemented in a browser using a scripting
language such as JavaScript.
Since
this is a redirection-based flow, the client must be capable of
interacting with the resource owner's user-agent (typically a web
browser) and capable of receiving incoming requests (via redirection)
from the authorization server.
Unlike
the authorization code grant type, in which the client makes
separate requests for authorization and for an access token, the
client receives the access token as the result of the authorization
request. The implicit grant type does not include client
authentication, and relies on the presence of the resource owner and
the registration of the redirection URI. Because the access
token is encoded into the redirection URI, it may be exposed to the
resource owner and other applications residing on the same device.
3) Resource Owner Password Credentials
With
the resource
owner password credentials grant
type, the user provides their service credentials (username and
password) directly to the application, which uses the credentials to
obtain an access token from the service. This grant type should only
be enabled on the authorization server if other flows are not viable.
Also, it should only be used if the application is trusted by the
user
This grant type is suitable for clients capable of obtaining the resource owner's credentials (username and password, typically using an interactive form). It is also used to migrate existing clients using direct authentication schemes such as HTTP Basic or Digest authentication to OAuth by converting the stored credentials to an access token.

With
this type of authorization, credentials (and thus the password) are
sent to the client and then to the authorization server. It is
therefore imperative that there is absolute trust between these two
entities. It is mainly used when the client has been developed by the
same authority as the authorization server. For example, we could
imagine a website named example.com seeking access to protected
resources of its own subdomain api.example.com. The user would not be
surprised to type his login/password on the site example.com since
his account was created on it.
Example:
-
Resource Owner: you having an account on acme.com website of the Acme company
-
Resource Server: Acme company exposing its API at api.acme.com
-
Client: acme.com website from Acme company
-
Authorization Server: an Acme server
Scenario:
-
Acme company, doing things well, thought to make available a RESTful API to third-party applications.
-
This company thinks it would be convenient to use its own API to avoid reinventing the wheel.
-
Company needs an access token to call the methods of its own API.
-
For this, company asks you to enter your login credentials via a standard HTML form as you normally would.
-
The server-side application (website acme.com) will exchange your credentials against an access token from the authorization server (if your credentials are valid, of course).
-
This application can now use the access token to query its own resource server (api.acme.com).
4) Client Credentials
The
client can request an access token using only its client credentials
(or other supported means of authentication) when the client is
requesting access to the protected resources under its control, or
those of another resource owner that have been previously arranged
with the authorization server (the method of which is beyond the
scope of this specification).

When it should be used?
This type of authorization is used when the client is himself the resource owner. There is no authorization to obtain from the end-user.
Example:
-
Resource Owner: any website
-
Resource Server: Google Cloud Storage
-
Client: the resource owner
-
Authorization Server: a Google server
Scenario:
-
A Website stores its files of any kind on Google Cloud Storage.
-
The website must go through the Google API to retrieve or modify files and must authenticate with the authorization server.
-
Once authenticated, the website obtains an access token that can now be used for querying the resource server (Google Cloud Storage).
Tokens
Tokens are random strings generated by the authorization server and are issued when the client requests them.
There
are 2 types of token:
1)
Access
Token:
this
is the most important because it allows the user data from being
accessed by a third-party application. This token is sent by the
client as a parameter or as a header in the request to the resource
server. It has a limited lifetime, which is defined by the
authorization server. It
must be kept confidential as soon as possible
but
we will see that this is not always possible, especially when the
client is a web browser that sends requests to the resource server
via Javascript.
"Access tokens must be kept secret, security considerations are less strict due to their shorter life."
The
access token can be sent in several ways to the resource server.
1).Request parameter (GET or POST)
Example using GET: https://api.example.com/profile?access_token=MzJmNDc3M2VjMmQzN
This
is not ideal because the token can be found in the access logs of the
web server.
2) Authorization
header
GET
/profile HTTP/1.1
Host:
api.example.com
Authorization:
Bearer MzJmNDc3M2VjMmQzN
Or
Authorization:
Bearer
eyJhbGciOiJIUzUxMiJ9.eyJzdWIiOiJyZWZyZXNoIiwidXNlciI6IjNkaWFkbWluQDNkaW1haWwuY29tIiwidXNlclR5cGUiOiJDaXRpemVuIiwiaWF0IjoxNTc2NzM5MTg5fQ.gXf2ykS6qaqtVLLvN3mYWijlVkkw8XVFDhsNQn8aC5f2gN-_2O_4607z84h5hATRkaijpufS7lKU1gwBOC2OoQ
It
is elegant but all resource servers do not allow this.
2)
Refresh
Token:
this
token is issued with the access token but unlike the latter, it is
not sent in each request from the client to the resource server. It
merely serves to be sent to the authorization server for renewing the
access token when it has expired. For security reasons, it is not
always possible to obtain this token. We will see later in what
circumstances.
The
refresh token normally is sent together with the access token.The
refresh token is used to get a new access token, when the old one
expires. Instead of the normal grant type, the client provides the
refresh token, and receives a new access token.
Using
refresh tokens allows for having a short expiration time for access
token to the resource server, and a long expiration time for access
to the authorization server.
This
split way of handling authorization checks allows for three things:
-
Improved access patterns against the authorization server (lower load, faster checks)
-
Shorter windows of access for leaked access tokens (these expire quickly, reducing the chance of a leaked token allowing access to a protected resource)
-
Sliding-sessions (see below)
Sliding-sessions
Sliding-sessions
are sessions that expire after a period
of inactivity.
As you can imagine, this is easily implemented using access tokens
and refresh tokens. When a user performs an action, a new access
token is issued. If the user uses an expired access token, the
session is considered inactive and a new access token is required.
Whether this token can be obtained with a refresh token or a new
authentication round is required is defined by the requirements of
the development team.
Security considerations
Refresh
tokens are long-lived.
This means when a client gets a refresh token from a server, this
token must be stored
securely
to
keep it from being used by potential attackers. If a refresh token is
leaked, it may be used to obtain new access tokens (and access
protected resources) until it is either blacklisted or it expires
(which may take a long time). Refresh tokens must be issued to a
single authenticated client to prevent use of leaked tokens by other
parties. Access tokens must be kept secret, but as you may imagine,
security considerations are less strict due to their shorter life.
Token Types
Access tokens have a type, which defines how they are constructed.
1) Bearer Tokens
The
bearer tokens use HTTPS security, and the request is not signed or
encrypted. Possession of the bearer token is considered
authentication.
Bearer
Tokens are the predominant type of access token used with OAuth 2.0.
A
Bearer Token is an opaque string, not intended to have any meaning to
clients using it. Some servers will issue tokens that are a short
string of hexadecimal characters, while others may use structured
tokens such as JSON
Web Tokens.
#
Provide the list of scopes this token is valid for
$scope
= 'read write';
$token_data
= array(
#
Subject (The user ID)
'sub'
=> $user_id,
#
Issuer (the token endpoint)
'iss'
=> 'https://' . $_SERVER['PHP_SELF'],
#
Client ID (this is a non-standard claim)
'cid'
=> $client_id,
#
Issued At
'iat'
=> time(),
#
Expires At
'exp'
=> time()+7200, // Valid for 2 hours
#
The list of OAuth scopes this token includes
'scope'
=> $scope
);
$token_string
= JWT::encode($token_data, $jwt_key);
This
will result in a string such as:
eyJ0eXAiOiJKV1QiLCJhbGciOiJIUzI1NiJ9.eyJzdWIiOjEwMDAsImlzcyI6Imh0dHBzOi8vYXV0aG9yaXphdGlvbi1zZXJ2ZXIuY29tIiwiY2lkIjoiaHR0cHM6Ly9leGFtcGxlLWFwcC5jb20iLCJpYXQiOjE0NzAwMDI3MDMsImV4cCI6MTUyOTE3NDg1MSwic2NvcGUiOiJyZWFkIHdyaXRlIn0.QiIrnmaC4VrbAYAsu0YPeuJ992p20fSxrXWPLw-gkFA
For
example, this token’s first component is this JSON object:This
token is made up of three components, separated by periods. The first
part describes the signature method used. The second part contains
the token data. The third part is the signature.
{
"typ":"JWT",
"alg":"HS256”
}
|
The
second component contains the actual data the API endpoint needs in
order to process the request, such as user identification and scope
access.
{
"Sub":1000,
"Iss":
"https://authorization-server.com","cid": "https://example-app.com", "iat":1470002703, "exp": 1470009903, "scope": "read write"
}
|
Base64-encoding
the first two components results in these following two strings:
| eyJhbGciOiJIUzI1NiIsInR5cCI6IkpXVCJ9 |
eyJzdWIiOjEwMDAsImlzcyI6Imh0dHBzOi8vYXV0aG9yaXphdGlvbi1ZXJ2ZXIuY29tIiwiY2lkIjoiaHR0cHM6Ly9leGFtcGxlLWFwcC5jb20iLCJpYXQiOjE0NzAwMDI3MDMsImV4cCI6MTUyOTE3NDg1MSwic2NvcGUiOiJyZWFkIHdyaXRlIn0
We
then calculate a hash of the two strings along with a secret,
resulting in another string:
| QiIrnmaC4VrbAYAsu0YPeuJ992p20fSxrXWPLw-gkFA |
Finally,
concatenate all three strings together separated by periods.
eyJ0eXAiOiJKV1QiLCJhbGciOiJIUzI1NiJ9.eyJzdWIiOjEwMDAsImlzcyI6Imh0dHBzOi8vYXV0aG9yaXphdGlvbi1zZXJ2ZXIuY29tIiwiY2lkIjoiaHR0cHM6Ly9leGFtcGxlLWFwcC5jb20iLCJpYXQiOjE0NzAwMDI3MDMsImV4cCI6MTUyOTE3NDg1MSwic2NvcGUiOiJyZWFkIHdyaXRlIn0.QiIrnmaC4VrbAYAsu0YPeuJ992p20fSxrXWPLw-gkFA
Decoding
Verifying
the access token can be done by using the same JWT library. The
library will decode and verify the signature at the same time, and
throws an exception if the signature was invalid, or if the
expiration date of the token has already passed.
2) MAC Tokens
More
secure than bearer tokens, MAC tokens are similar to signatures, in
that they provide a way to have (partial) cryptographic verification
of the request.
The
MAC Token mechanism requires the establishment of a shared symmetric
key between the client and the resource server. This specification
defines a three party key distribution protocol to dynamically
distribute this session key from the authorization server to the
client and the resource server.
In
particular, when a server uses this mechanism, a passive attacker
will be unable to use an eavesdropped access token exchanged between
the client and the resource server. In addition, this mechanism helps
secure the access token against leakage when sent over a secure
channel to the wrong resource server if the client provided
information about the resource server it wants to interact with in
the request to the authorization server.
Client Key-Exchange
Authorization
Servers
issue
MAC Tokens based on requests from clients.
The request MUST include the audience parameter defined in OAuth
2.0 Audience Information,
which indicates the Resource
Server
the
client
wants
to interact with. This specification assumes use of the Authorization
Code Grant.
If the request is processed successfully by the Authorization
Servers
it
MUST
return
at least the following parameters to the client:
-
kid - The name of the key (key id), which is an identifier generated by the Resource Server. It is RECOMMENDED that the Authorization Servers generates this key id by computing a hash over the Access Token, for example using SHA-1, and to encode it in base64 format.
-
access_token - The OAuth 2.0 Access Token.
-
mac_key - The Session Key generated by the Authorization Servers. Note that the lifetime of the Session Key is equal to the lifetime of the Access Token.
-
mac_algorithm - The MAC algorithm used to calculate the request MAC. The value MUST be one of "hmac-sha-1", "hmac-sha-256", or a registered extension algorithm which uses the OAuth Parameters Registry. The authorization server is assumed to know the set of algorithms supported by the client and the Resource Server. It selects an algorithm that meets the security policies and is supported by both nodes.
Resource Server and Authorization Server Key-Exchange
The
transport of the mac_key from the Authorization
Servers
to
the Resource
Server
is
accomplished by conveying the encrypting mac_key inside the Access
Token.
At the time of writing only one standardized format for carrying the
Access
Token
is
defined: the JSON
Web Token(JWT).
Note that the header of the JSON
Web Encryption
(JWE)
structure, which is a JWT
with
encrypted content, MUST contain a key id (kid) in the header to allow
the Resource
Server
to
select the appropriate keying material for decryption. The keying
material is a Symmetric
Key
or
an Asymmetric
Key
long-term
key established between the Resource
Server
and
the Authorization
Servers.
The establishment of this long-term key is outside the scope of this
specification.
This
document defines two new claims to be carried in the JWT:
-
mac_key - The session key generated by the Authorization Servers.
-
kid - The name of the key (key id), which is an identifier generated by the Resource Server.
These
two parameters match the content of the mac_key and the kid conveyed
to the client.
Access token scope
The
scope is a parameter used to limit the rights of the access token.
This is the authorization server that defines the list of the
available scopes. The client must then send the scopes he wants to
use for his application during the request to the authorization
server. More the scope is reduced, the greater the chance that the
resource owner authorizes access.
The
authorization and token endpoints allow the client to specify the
scope of the access request using the "scope" request
parameter. In turn, the authorization server uses the "scope"
response parameter to inform the client of the scope of the
access token issued.
The
value of the scope parameter is expressed as a list of space-
delimited, case-sensitive strings. The strings are defined by the
authorization server. If the value contains multiple
space-delimited strings, their order does not matter, and each string
adds an additional access range to the requested scope.
scope=write&grant_type=password&username=3diAdmin@3dimail.com&password=Demo1234&realm=Citizen&authType=selfSignup
scope = scope-token *( SP scope-token )
scope-token
= 1*( %x21 / %x23-5B / %x5D-7E )
scope
= 'read write';
The
authorization server MAY fully or partially ignore the scope
requested by the client, based on the authorization server policy or
the resource owner's instructions. If the issued access token scope
is different from the one requested by the client, the authorization
server MUST include the "scope" response parameter to
inform the client of the actual scope granted.
If
the client omits the scope parameter when requesting
authorization, the authorization server MUST either process the
request using a pre-defined default value or fail the request
indicating an invalid scope. The authorization server SHOULD
document its scope requirements and default value (if defined).
-
root_readwrite - Read and write all files and folders
-
manage_enterprise - Manage an enterprise
-
manage_managed_users - Manage an enterprise's managed users
-
manage_groups - Manage an enterprise's groups
-
manage_enterprise_properties - Manage an enterprise's properties
-
manage_data_retention - Manage an enterprise's retention policies
-
manage_app_users - Create and manage app users
-
manage_webhook - Manage Webhooks
The HTTP response headers
This section lists the HTTP response headers that servers send back for access control requests as defined by the Cross-Origin Resource Sharing specification. The previous section gives an overview of these in action.
1) A returned resource may have one Access-Control-Allow-Origin header, with the following syntax:
Access-Control-Allow-Origin:
| *
Access-Control-Allow-Origin specifies either a single origin, which tells browsers to allow that origin to access the resource; or else — for requests without credentials — the "*" wildcard, to tell browsers to allow any origin to access the resource.
For example, to allow code from the origin https://mozilla.org to access the resource, you can specify:
Access-Control-Allow-Origin: https://mozilla.org
Vary: Origin
If the server specifies a single origin (that may dynamically change based on the requesting origin as part of a white-list) rather than the "*" wildcard, then the server should also include Origin in the Vary response header — to indicate to clients that server responses will differ based on the value of the Origin request header.
Access-Control-Allow-Origin
is
a CORS (Cross-Origin
Resource Sharing)
header. This header allows the defined third party to access a given
resource. This header is a workaround for restrictions posed by the
Same
Origin Policy
which
doesn’t allow two different origins to read the data of each other.
For
example, if Site
ABC
wants
to access a resource of Site
XYZ,
Site
XYZ
will
respond with an Access-Control-Allow-Origin
header
with the address of Site
ABC.
In this way Site
XYZ
is
telling the browser who is allowed to access its content:
Access-Control-Allow-Origin:
SiteABC.com
Attack
Scenario
If
Access-Control-Allow-Origin
is
weakly configured, an attacker can read the data from the target
website by using another third party website. Many developers use a
wildcard for Access-Control-Allow-Origin
header
which allows any website to read the data from their website.
2) The Access-Control-Expose-Headers header lets a server white list headers that browsers are allowed to access.
Access-Control-Expose-Headers:
[, ]*
For example, the following:
Access-Control-Expose-Headers: X-My-Custom-Header, X-Another-Custom-Header
would allow the X-My-Custom-Header and X-Another-Custom-Header headers to be exposed to the browser.3) The Access-Control-Max-Age header indicates how long the results of a preflight request can be cached. For an example of a preflight request, see the above examples.
This
defines a time for which the webserver should be accessed only
through HTTPS. The default value of this header is 31536000 seconds.
This is the maximum age (time) for which HSTS is valid. The server
updates this time with every new response hence preventing it from
expiring.
The delta-seconds parameter indicates the number of seconds the results can be cached.
Attack Scenario
Without HSTS enabled, an adversary can perform a man-in-the-middle attack and steal sensitive information from the web session of a user. Imagine a scenario where a victim connects to an open Wi-Fi which is actually in the control of an attacker. Accessing a website over HTTP would allow the attacker to intercept the request and read the sensitive information. (The site is on HTTPS but user accesses it with HTTP which later gets redirected to HTTPS). If the same user had accessed the website earlier, the HSTS details recorded in the browser would have caused the connection to be made over HTTPS automatically.Access-Control-Allow-Credentials
4) The Access-Control-Allow-Credentials header Indicates whether or not the response to the request can be exposed when the credentials flag is true. When used as part of a response to a pref light request, this indicates whether or not the actual request can be made using credentials. Note that simple GET requests are not pref lighted, and so if a request is made for a resource with credentials, if this header is not returned with the resource, the response is ignored by the browser and not returned to web content.
For example :: Access-Control-Allow-Credentials: true
5) The Access-Control-Allow-Methods header specifies the method or methods allowed when accessing the resource. This is used in response to a preflight request. Ex: Access-Control-Allow-Methods: GET,POST,DELETE,PUT,HEAD,OPTIONS
Access-Control-Allow-Methods:
[, ]*
An example of a preflight request is given above, including an example which sends this header to the browser.Access-Control-Allow-Headers
6) The Access-Control-Allow-Headers header is used in response to a preflight request to indicate which HTTP headers can be used when making the actual request.
Access-Control-Allow-Headers:
[, ]*
Access-Control-Allow-Headers:
accept,authorization,origin,Content-Type,x-prototype-version,x-requested-with,X-JSON,language,appid,accept-language,accept-encoding,referer,X-Prototype-Version,captcha,key,token,appkey,X-Requested-With,
Language,customtoken
7)
X-FrameOptions
This
header is used to protect the user against ClickJacking
attacks
by
forbidding the browser to load the page in an iframe
element.
Ex: X-Frame-Options:
DENY
There
are 3 directives for X-FrameOptions:
-
X-Frame-Options: DENY – This will not allow the page to be loaded in a frame on any website.
-
X-Frame-Options: same-origin – This will allow the page to be loaded in a frame only if the origin frame is same i.e. A page on www.site.com will load in a frame only if the parent page on which the frame is being loaded has the same origin (www.site.com)
-
X-Frame-Options: allow-from uri – The frame can only be displayed in a frame on the specified domain/origin.
Attack
Scenario
An
adversary could trick a user to access a malicious website which will
load the target application into an invisible iframe. When the user
clicks on the malicious application (ex. a web-based game), the
clicks will be ‘stolen’ and sent to the target application
(Clickjacking). As a result, the user will click on the legitimate
application without his consent, which could result in performing
some unwanted actions (ex. delete an account, etc).
8) X-XSS-Protection
This
header is designed to protect against Cross-Site
Scripting attacks.
Ex: X-XSS-Protection:
1;
mode=block
It
works with the XSS filters used by the modern browsers and it has 3
modes:
-
X-XSS-Protection: 0; – Value 0 will disable the XSS filter
-
X-XSS-Protection: 1; – Value 1 will enable the filter, in case the XSS attack is detected, the browser will sanitize the content of the page in order to block the script execution.
-
X-XSS-Protection: 1; mode=block – Value 1 used with block mode will prevent the rendering of the page if an XSS attack is detected.
Examples
X-XSS-Protection
header
implemented correctly on linkedin.com
X-XSS-Protection
header
missing on instagram.com
9) X-Content-Type-Options
This
response header is used to protect against MIME sniffing
vulnerabilities. So what is MIME Sniffing? MIME sniffing is a feature
of the web browser to examine the content of the file being served.
It works as follows:
-
A web browser requests a file. The server sends a file with the HTTP header Content-Type set.
-
The web browser ‘sniffs’ the content of this file in order to determine the file format.
-
Once done with the analysis, the browser compares its result with the one sent by the server. If there is a mismatch, the browser uses the identified format.
This
may result in a security vulnerability. How?
Attack
Scenario
-
An application allows the user to upload an image file and validates its extension
-
A user uploads an image file with jpg or png extension but this file contains malicious HTML code as well
-
The browser renders the file with HTML which contains the code and executes in the browser
By
setting the header X-Content-Type-Options
to
nosniff, the browser will no longer ‘sniff’ the content of the
file received but use the value from the Content-Type
header.
This header is specific to IE and Chrome browsers. Ex:
X-Content-Type-Options:
nosniff
The HTTP request headers
This
section lists headers that clients may use when issuing HTTP requests
in order to make use of the cross-origin sharing feature. Note that
these headers are set for you when making invocations to servers.
Developers using cross-site XMLHttpRequest
capability
do not have to set any cross-origin sharing request headers
programmatically.
Origin
1)
The
Origin
header
indicates the origin of the cross-site access request or preflight
request.
Origin:
Ex: Origin:
http://192.168.0.140
The
origin is a URI indicating the server from which the request was
initiated. It does not include any path information, but only the
server name. Note:
The
origin value can be null, or a URI. Note that in any access control
request, the Origin
header
is always
sent.
2)
The
Access-Control-Request-Method
is
used when issuing a preflight request to let the server know what
HTTP method will be used when the actual request is made.
Access-Control-Request-Method:
ex: Access-Control-Request-Method: POST
3)
The
Access-Control-Request-Headers
header
is used when issuing a preflight request to let the server know what
HTTP headers will be used when the actual request is made.
Access-Control-Request-Headers:
[, ]*
Access-Control-Request-Headers: X-PINGOTHER, Content-Type
References:


Comments
Post a Comment